Thursday, January 31, 2013

Simple Holiday Decorations

We just don't have a lot of space here in the cozy country cottage. Storage is at a minimum so I don't have a lot of holiday (other than Christmas) decorations that I keep from year to year. You saw my simple mantle decor...those pieces are easy to stack & store but one of my other favorite ways to decorate for the holidays & seasons is to use pieces that can stay out year round and just switch them up a bit.

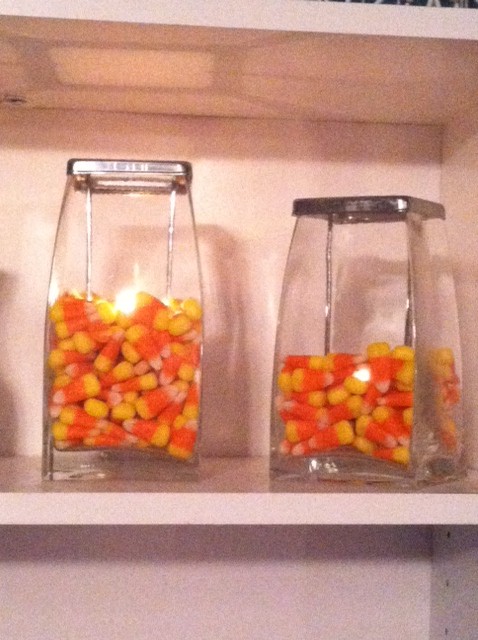
I found two great tea light holders at Goodwill several months ago. I liked that the metal pieces on top were attached to where the tea light goes so you can easily light the candles then lower the "lid". Since they're glass I can add to them for each season.

For Fall...

After Thanksgiving I replaced the candy corn with red garland beads...and of course for the life of me can't figure out what I did with that pic but trust me...it was cute!

And now for Valentine's Day...


See how I tried to get a little more artsy with my photo skills?? My pic turned out a little darker than it should have but you get the idea and you can see the glow of the candles.

Think of all the little ways you can add some holiday decor to your little corners! I liked these little Goodwill finds from the start but now that I'm finding new ways to use them, I really LOVE them! You could do the same with simple vases or jars too!


Wednesday, January 23, 2013

My Next House Will have a Mantel

But until then...I will make do!

Growing up, my parents had a fireplace built into a brick wall with a mantle but the only time my mom ever decorated it was at Christmas. The rest of the year it sat filled with her "fancy" pieces that couldn't be anywhere else because of my younger brother & sister. I never would've touched that stuff...I knew better. They, on the other hand could NOT be trusted (wink, wink).

The houses I lived in in Florida didn't have fireplaces, just not too common and since moving back I've only been lucky enough to have one, but the ex inherited that lease. So...one day, I will have a mantle of my own. I see the mantle as a great area for displays and it would be so much fun to be able to change it out with the seasons. There are thousands of pins on Pinterest so if you ever run short of imagination, check that out!

In the meantime, I've got a little shelf. I call it my mantle, even if it is only 18 inches long and hangs over my desk. Here's what I did for Christmas...


I love my little canvas painting from my friend Michelle at Studio 7 Canvas Creations. You should check her out!

And today I just finished up a simple but cute "XO" for Valentine's Day and added it to a small piece of wood I had painted, distressed & embellished a few years ago. Here's my "mantle" today...


I didn't realize until getting this pic ready that the dot over the "i" is missing so I'll have to fix that but anytime there's pink, rosettes & buttons, you just can't go wrong!

Do you have a mantle or an area in your home that always gets the holiday treatment? I love changing things up...it keeps the heathens on their toes!

Saturday, December 15, 2012

Jumping on the Bandwagon

I'm a thrifty girl. You'll never hear me bragging about how much I've spent on something, but I'll tell you all day long how much money I saved. I refuse to pay full price. I want to continue that but toss in some other ways to save while also reducing the number of chemicals/toxins in our house...the homemade laundry detergents that are all the rage on Pinterest and elsewhere right now is my next project to tackle. Fewer chemicals AND saving money?? YES PLEASE!!

One of the homemade products I've already tried and successfully used for almost 2 years now is my homemade pupper shampoo. (Yes pupper=dog)  I've even bottled & sold it before! A few have asked about the vinegar-y smell but once your pup is rinsed you'll barely even notice it. There are LOTS of recipes out there but this is the one I've liked the best. Oh and just so you know, this isn't a super sudsy shampoo but it does a great job of getting my little Romeo clean!

So here it is...

1 c Ivory dish soap
1 c apple cider vinegar
3/4 c distilled water
1/4 c glycerin

Use a funnel to pour these items into a jar with a tight lid and SHAKE!! 

I wish I could remember where I originally found this recipe to give credit where due but when I did a search this same recipe came up under several sites. I did see this explanation on a Yahoo site as to why this shampoo works...

Creating the Best Homemade Dog Shampoo for your Pup  "It Works! The dish soap serves the basic purpose of loosening and cleaning off the dirt on your pup! The apple cider serves two purposes. The first is to bring the dish soap to a proper ph level. Second it clears up that unpleasant dog smell and repels fleas. The glycerin moisturizes your dog's skin. Moisturized skin is less itchy!"

So there you have it...my borrowed recipe for pup shampoo! Let me know how it works for you!!


Thursday, November 8, 2012

One Day off Just Isn't Enough

What's that phrase...A bad day of crafting is still better than a good day at work? Yeah, something like that!

I usually wind up with one day each week completely free of any of my jobs and it's usually Thursdays. That's also my unshare day with their dad so I technically have between the hours of 9 and 3 to cram in all those mommy jobs and crafting that I can so believe me, when I mess something up and have to start over IT. KILLS. ME.

Today definitely started out that way. Wanted to try sewing some reusable hand warmers for stocking stuffers but I made the mistake of using flannel. It frays. Badly. I tried to take the easy way out & just zigzag the edges instead of sewing them inside out & blah blah blah. BUT the fabric frayed away from the stitching as soon as I got it done. Then I made a complete mess attempting to get the rice into the uncutesy little heart pouch. So...project scrapped. Rice everywhere.

Take Two...I've got a special order for a small canvas. It's the owl one on my Facebook page, Blissfully Chaotic Boutique. It's 5x7 on the page but I didn't have enough of the lettering I used the first time. The new lettering (which I LOVE) is bigger & when I tried to fit it all onto the canvas it just didn't work. SCRAPPED!! Contacted the client & offered the larger size so the paint is drying on it now!

Attempted to do some cleaning to rid my mind of these small failures and made some pumpkin bread. Ready for another shot at some projects while Facebooking & Pinteresting in between. Still a way better day than going to the J-O-B though!

"What would you attempt to do if you knew you could not fail??"  I usually know I'll screw up once or twice but I just keep going!!


Saturday, September 1, 2012

Love to Have my Goodies Loved...

My coworkers rock...they love it when I bring treats in and I love to do it. I can bake & try new recipes without the goodies sitting around waiting to be eaten by me!! They also ooh & ah over almost everything I make so who wouldn't love that???

It's been a long work week & I've got another long week ahead but since they asked for something tomorrow, I want to deliver!! So, I'm going the lazy route tonight and using a recipe originally posted by Imalazymom.com. These taste amazing, only have 4 ingredients and are super easy.

Lazy Cake Cookies (more like brownies but I'll go with it...)

Preheat oven to 350.

1 box yellow cake mix
2 eggs beaten
5T melted butter
2 C chocolate chips (I never measure...just eyeball the dough & see if it could use more!!)

Mix all the ingreds in a bowl...

It will be a big dough ball. Spread in a 9x13 pan thats been sprayed with Pam.

The original recipe says to bake for 20 minutes but this is what mine looked like after 14 minutes...

Soooooo yummy!! The house smells so good!! Hope the gang at work likes them!!

Saturday, June 23, 2012

Make Me Over Monday...a tad late!!

A few years ago I picked up the cutest white wooden rocker for my youngest heathen to have on the front porch. She outgrew it and it just sat out in the weather and started looking like this...

Very sad considering how cute it had been!! I knew I wanted to do something with it but just couldn't figure it out! Then as I was going through my stencils one day I found one that I knew would be adorable for it! So...that poor sad looking chair became this...

I kept a little bit of a distressed look to it to keep with it's style. A family member snatched it right up as soon as I posted it on my Blissfully Chaotic page so I still get to see my little rocker being put to good use!

I hit a rummage sale yesterday and found an adorable children's set...2 wooden chairs and a matching table that are just screaming for a BC make over!! Stay tuned....

Monday, May 14, 2012

Make-Me-Over Monday!!

As many of you already know I love taking something old or ugly and turning it in to something fun & funky! I'm hoping to start this feature on a regular basis, especially now that garage sale season is in full swing. Today's project was a fairly simple one...paint and some fabric and a few embellishments to funk it up a bit.

A wonderful friend was having a garage sale last week and it was within walking distance. Always a good thing when on a tight budget...I wouldn't be able to carry a lot home so hopefully I wouldn't buy a lot. A strong theory but where there's a will, there's a way...and a truck right around the corner. This time it all worked out though. My only purchase was this well used $2 bulletin board...

A little bland for my taste but the cork still had plenty of life! I didn't know what my plans were for it but I had some ideas right away.

I checked out my paint & fabric stash and got to work. There were a few imperfections in the frame due to it's age but I used the embellishments to hide those as well as a little goof or too by me. I learned a few lessons in this project but overall I'm happy with the makeover!


The bottom part is chalkboard paint so there's plenty of space for both thumb-tacked notes and quick reminders!

Happy Make-Me-Over Monday...now it's time to do the housework I've avoided all day to finish this up!